Remember the thrill of folding a simple sheet of paper and watching it soar across the room? Learning how to make a paper airplane isn’t just a childhood pastime—it’s an art, a science, and a fun challenge all rolled into one.
Whether you’re aiming for distance, speed, or precision, the secret is in the folds. In this guide, we’ll show you how to make a paper airplane step by step, including designs that fly far, fly straight, and even mimic a jet.
Why Making a Paper Airplane Is Fun and Useful
Paper airplanes aren’t just toys—they teach patience, creativity, and even basic aerodynamics.
-
Boosts creativity: Experimenting with folds and designs encourages problem-solving.
-
Teaches aerodynamics: Weight distribution, wing shape, and folds affect flight.
-
Easy and cheap fun: No materials needed beyond a sheet of paper.
Materials You’ll Need
-
A standard 8.5 x 11 inch sheet of paper (printer paper works best)
-
A flat surface for folding
-
Optional: Ruler for precise folds
Pro Tip: Thicker paper makes your plane fly straighter, while lighter paper can glide farther.
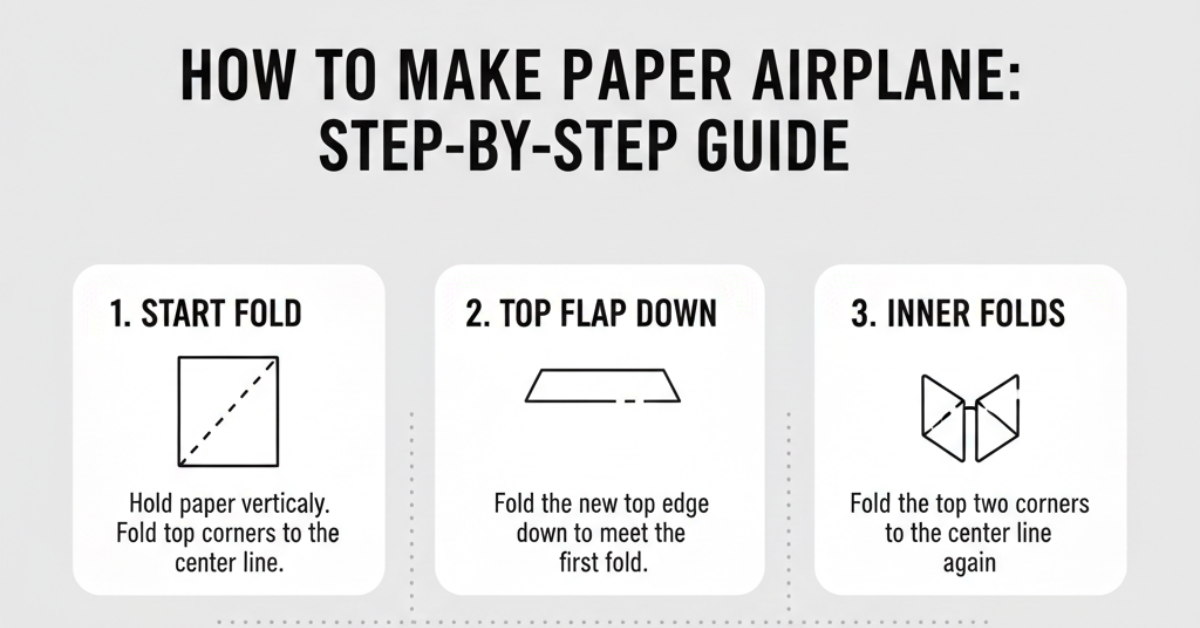
How to Make a Paper Airplane Easy (Beginner-Friendly)
Here’s a simple design that anyone can fold in minutes:
Steps:
-
Fold the paper in half lengthwise and crease well, then unfold.
-
Fold the top corners toward the center crease to form a triangle.
-
Fold the angled edges again toward the center line.
-
Fold the paper in half along the original crease.
-
Fold the wings down evenly on both sides.
-
Adjust wing tips slightly upward for stability.
You now have a basic paper airplane that’s perfect for beginners.
How to Make a Paper Airplane That Flies Far
Distance depends on a few key tweaks:
-
Sharper nose: Taper the front folds tightly to reduce drag.
-
Longer wings: Increase surface area for more lift.
-
Even weight distribution: Ensure folds are symmetrical.
Step-by-step:
-
Start with a rectangle sheet, fold in half lengthwise.
-
Fold both top corners into the center line.
-
Fold the triangle tip down about an inch.
-
Fold top corners again toward the center.
-
Fold the plane in half, wings out.
-
Bend wings slightly upward at the edges.
This design is ideal if you’re competing for the farthest throw in your office or classroom.
How to Make a Paper Airplane Jet
Want speed and style? The paper jet is your go-to.
Step-by-step:
-
Fold paper in half lengthwise, crease, and unfold.
-
Fold top edges toward the center line to make a triangle tip.
-
Fold the tip downward slightly.
-
Fold triangle corners inward again for a narrow, pointed nose.
-
Fold the plane in half, wings out.
-
Fold edges of wings downward slightly to mimic jet flaps.
This design maximizes speed and looks impressive when thrown.
Tips for Making Your Paper Airplane Fly Far and Straight
-
Keep folds sharp and symmetrical.
-
Avoid crumpled edges—they create drag.
-
Slight upward wing bends can improve flight stability.
-
Test and tweak: small adjustments change distance and flight path.
Fun experiment: Make three planes of the same design but vary the nose weight. See which flies farthest!
FAQs About Paper Airplanes
Q1: What is the easiest paper airplane to make?
A: The basic triangle fold is the simplest and fastest for beginners.
Q2: How can I make my paper airplane fly farther?
A: Use a sharp nose, symmetrical folds, and slightly upward wing tips.
Q3: Can paper airplanes mimic jets?
A: Yes! Narrow, pointed designs with folded flaps can resemble jets and fly faster.
Q4: What kind of paper works best?
A: Standard printer paper works well. Heavier paper increases stability, lighter paper increases glide.
Q5: Why does my paper airplane crash quickly?
A: Likely due to uneven folds, bent edges, or nose weight imbalance. Small tweaks can fix this.
Conclusion
Mastering how to make a paper airplane is all about practice and experimentation. From beginner-friendly models to jets that zip across the room, every fold affects flight. Now that you know the step-by-step techniques, try creating multiple designs and see which flies the farthest, straightest, or fastest.